How to combine partitions into one volume. Correctly merging hard disk partitions
When installing operating systems, many computer technicians divide one physical disk into several partitions or volumes. As a rule, this is done to increase convenience when reinstalling Windows OS, as well as to ensure the security of stored information. One volume is used for the system itself and installed programs, and the second is used to store various personal information: music, photos, films, documents, computer games. This article describes how you can combine different hard drive partitions into one, as well as how to delete an extra volume.
If you are working on a computer running Windows 7 or higher, you can use the built-in utility to disconnect, delete or merge local volumes of your disks. Windows XP does not provide this feature, so you need to download special software. The following article describes each option in detail.
General information and comparison of methods
Starting from Windows 7, all Windows distributions have a special built-in utility for working with hard drives. With its help, users can split a physical disk into local ones and attach them back.
The advantage of this program is that it is already installed on any OS, and you do not need to search for it on the Internet and install it. The negative aspects include the rather limited functionality - before merging hard drive partitions, users will need to transfer all important data from the non-primary volume to another location.
The fact is that the utility does not support regular volume merging; you will first need to completely delete one partition, and only then connect it to the system disk.
If you install additional software, it will help you combine several volumes into one without deleting all the information.
Windows Standard Tools
To get started with logical drives in Windows 7, users will need to do the following:

AOMEI Partition Assistant
If you use Windows XP or do not want to temporarily transfer all your important information, you can use the AOMEI Partition Assistant application. With its help, you can combine several logical HDDs into one without losing data.
The question of how to combine two disks into one is one of the most frequently asked among computer users. This can be useful in many situations, including even issues related to installing a single file system for all partitions, converting GPT or RAW formats that may not be accepted by the operating system, installing software that requires a lot of disk space, etc. The user can be offered two main methods of combining, which will be discussed further in as much detail as possible. The proposed solutions work equally well when performing such actions with logical partitions and when working with RAID arrays, when two or more independent hard drives are installed on the computer.
Benefits of combining hard drives or partitions
It goes without saying that the first and main factor influencing a positive decision in favor of merging partitions is increasing the available disk space on one disk, which is extremely necessary when installing some programs.
On the other hand, as already mentioned, if different types of file systems are installed on disks or partitions, it is quite common to observe problems with the installation of certain types of software. Bringing them, so to speak, to a common denominator eliminates the problem entirely. Finally, if the system has unreadable RAW partitions or GPT format for hard drives larger than 2 TB, which the operating system may not perceive, such a tool is simply irreplaceable.
Merging options
Now a few words about how to combine two disks into one in Windows 7 and higher. First, you need to decide exactly how the partitions will be merged. First of all, we can highlight methods of combining with the loss of information or its preservation. The second is the use of standard system tools or third-party software.
It’s worth saying right away that the solution to the question of how to combine two disks into one, using the built-in Windows tools, does not imply the preservation of data that was originally located in one of the partitions (this is not provided at all). Therefore, before doing such things, all information from the partition being deleted (and it will actually be deleted and only then attached to the main disk or partition) must first be transferred to another partition or to removable media. As is already clear, there is no need to talk about the performance of installed programs. When solving the problem of how to combine two disks into one, but so that both the information is preserved and the applications work, it is necessary to use additional third-party tools. They will be discussed separately.
How to merge two disks into one in Windows 7 and higher versions using standard means?
First, let's look at the system's own tools. This is the disk management section. You can access it through the administration menu, but it’s easier to use the “Run” console, in which you need to enter the line diskmgmt.msc.

Here you select the partition through which you want to merge, and use the RMB menu to call up the volume deletion option. The system will immediately issue a warning that all information on the selected disk will be deleted. We agree.

We repeat a similar operation, but for the section. After this, the so-called unallocated area will appear.

Now you need to use RMB on the partition to which you will attach and select the volume extension line.

At the disk selection stage, most likely, free attachable space will be immediately added to the list. If this does not happen, you should use the add button yourself. After this, click the continue button, and in the next window - finish. If you look at the state of the disks and partitions after the operation is completed, you will see an increase in the space of one of the partitions at the expense of the other.
How to merge two disks into one using third-party programs
To manage disks and partitions, when you need to merge and save data, you can use third-party utilities that look much more powerful than the system’s own tools. These include software packages like Partition Assistant from AOMEI, Disk Director from Acronis, Partition Master from EaseUS and many others.

Let's look at the merging process based on the last mentioned utility. For example, we need to merge drive E and drive F, but so that after that only one partition E remains. In the main window of the Partition Manager section, use the merge button (Merge), check the boxes for the specified disks (partitions) and click the “OK” button. After checking the merge, the process will be in pending status. Click the Apply button and confirm the action. After this, the unification process will begin.

When it finishes, only one partition (E) can be seen in disk management. Explorer will show two hard drives in one hard drive or partition. Only drive F in partition E will be shown as a local directory (Local Disk F) with all the information that was previously present on it.
Brief conclusions
As a summary, it can be noted that if the user requires a quick merge, but there is no critical information on the attached disk or partition, you can use the system's tools. If data storage is mandatory, third-party programs will be needed. And further. Please note that if there is a second operating system on the combined disks in the attached partition, it will not be possible to run it.
If you are not satisfied with the disk space layout of your hard drive, you can resolve this kind of problem yourself. There is no need to seek help from a specialist; you can do it yourself. Right now you will be given the necessary recommendations regarding questions of how to combine hard drive partitions and what exactly is required in order to restore the hard drive directories. Believe me, everything is much simpler... The main thing is desire and attentiveness in actions. Let's get started, I guess.
Standard option
Using built-in Windows system tools, you can perform both partitioning and merging of disk space. However, this article is devoted to the second option - organizing a single volume from several components. Let's say you need to make one volume from two directories (C:\ and D:\).
- Open the Start menu and enter the command diskmgmt.msc in the search bar.
- The “Management...” service window will open.
- Mark the partition “D” and use the right mouse button to call up the context menu, from the list of which select the “Delete volume...” command. Of course, all data on it will be destroyed. Confirm your action.
- The next step is to point the cursor to drive “C” - call up the menu and activate the “Extend volume” command.
- In the new window, click “Next” and then select the unallocated area (removed drive “D”).
- Completing the process is the “Done” button. After the process described above, the system volume “C” will expand, and the question of how to combine hard disk partitions can be considered resolved.

Effective organizer: Acronis Disk Director Suite
The above program can, if not do everything, then do a lot. Launch Acronis and in the next minimized window, check “Manual mode”. There are no fundamentally different actions in using the presented program, meaning the considered option. However, the functionality of the software significantly prevails over Windows tools.
- Select the drive (D) and when calling the context menu, select “Merge”.
- In the next window, indicate the section to join (C).
- In the case when the drive (D) has data and has not been formatted, you need to create a folder where the transferred information will be located.
- Next, give it a name.
- In the next window, click on the new folder, then confirm “Ok”.
- The final action is to click on the shortcut in the form of a flag.
In order to understand how to combine hard drive partitions, one practical repetition is enough.
Partition recovery

A software failure is the main culprit when the system loses access to one of the hard drive volumes. However, Acronis can fix everything.
- Use manual mode again.
- In place of the partition there will be an unmarked area, by clicking on it, you need to select “Advanced”, then “Restore”.
- The next step is to select “Manually” and click “Next”.
- Then the Search Method window will appear, where Full is your choice.
- At this stage, you may see some kind of list through which hard drive partitions are restored. It is here, in this window, that all lost data is displayed. It is important to select from the list the section that most closely matches the size you are looking for.
- Now click on the familiar “Flag” and wait for the recovery process to complete, which the program will notify you about via a message.
Finally
As you can see, the question that has been tormenting you is “How to combine hard drive partitions?” in fact, it is easily resolved, moreover, it does not require special knowledge and IT skills from the user. To ensure that your hard drive works as long as possible and its performance always remains at its best, perform timely preventative maintenance: defragmentation, cleaning and checking for errors. Be effective!
If there is not enough space on one of the local disks, it can be increased at the expense of other volumes by merging them. The procedure of merging a hard drive partition does not pose a threat to user information, since you can choose whether to delete files or not.
About merging sections
There are two main options to do this procedure:
- Take advantage of built-in system functions. This can be convenient since you do not need to install any additional software. However, you may encounter serious functionality limitations.
- Use programs from third-party developers. In this case, you can access advanced functionality (depending on the program), but there is a need to install third-party software.
It is recommended to use the second option, since your data will not be damaged during merging, while the standard Windows utility will most likely format the disk. If saving information on a local disk is not important to you, or there is no information there, then you can safely use a standard disk utility.
Option 1: AOMEI Partition Assistant Standard
This is a convenient assistant program that is distributed free of charge and has a full-fledged Russian version. It will allow you to merge volumes or their partitions without losing user and system information. All information that could be deleted is moved to one of the local drives (by default, the one where the system is installed).
Instructions for using the program are as follows:

Once the merging procedure is complete, the system will reboot. Old data that was stored on the donor disk can be found in the folder "X-drive". Instead of X you will have the donor drive letter.
Option 2: Minitool Partition Wizard
The program has similar functionality to the one discussed above. However, there are some differences in the interface, plus there is no Russian version. Fortunately, the interface remains understandable for the average user with a basic understanding of the English language.
The instructions for the program look like this:

Option 3: Acronis Disk Director
This is a famous multifunctional program that will allow you to combine hard drive partitions, even if they have different file systems. However, you will have to pay for a convenient interface and extensive capabilities, since the software is distributed on a paid basis. There is a demo period that temporarily opens up all the features of the program for free.
Merging hard disk partitions in Acronis occurs as follows:

Option 4: Windows functionality
The operating system also has software in its functionality that is capable of performing basic operations with disks - “Disk Management”. With its help, you can combine volumes with each other, but the information on them will be deleted without the possibility of recovery. There are also cases when combining disks in this way is impossible, then you will have to resort to one of the options described above.
If you decide to use a standard Windows utility, then the instructions are as follows:
- Open line "Run", using the keys Win+R. You need to write the command in this line:
Click to execute Enter, or "OK".
- At the bottom of the window, select the disk partition that you would like to merge with another. Right-click on it and click "Delete Volume".
- Confirm the action by clicking on "Yes". After this, all information on the donor disk will be deleted (and the disk itself too). The freed space will be marked as "Not distributed". It will be marked only in the utility window. From "Conductor" this space will disappear.
- Now you need to distribute the free space. For example, add it to another disk. To do this, right-click on the disk you want to expand. A context menu will open where you need to select "Extend volume".
- A window will pop up "Volume Expansion Wizard". Check out the features "Masters" and press "Further".
- In this step, you need to specify the amount of space that you would like to add to the main disk. To do this, use the field called “Select the size of the allocated space (MB)”. Here you need to enter the volume in megabytes. One gigabyte is 1024 megabytes. But you don’t have to bother and fit in the entire available volume (see "Maximum available disk space"). When finished press "Further".
- A confirmation window will open where you need to click on "Ready".
- The partitions will be merged, but for them to take effect, it is recommended to restart the computer.


To combine hard disk partitions, you can use any of the proposed options. If you use third-party programs, then still back up your important data, as malfunctions are possible.
When working with a computer, situations may often arise when you need to resize hard drive partitions, or even merge them into one. For example, you need to install a new operating system, which is larger in volume than the previous one. Also, if the system has 2 or more logical volumes (not counting the partition with the operating system installed), it makes more sense to combine them into one. To do this, you can use both standard Windows tools and third-party software. Let's consider both options.
Method 1: merging disk partitions using standard Windows utilities.
Before starting the procedure in this way, you need to copy all the data from the partition that needs to be attached to another, since the volume is deleted before the operation and, accordingly, all information from it is erased. In Windows OS, there is a disk management console to perform such operations. To open it, right-click on the “Computer” icon and select “Manage”. The computer management console will open, where you need to select “Disk Management” in the left menu.The console displays all available drives. Now you need to select a section that is combined with some other. After that, right-click on it and select “Delete Volume”. We confirm the operation, after which the unallocated space will appear in the menu. Then open the context menu of the volume to which you want to attach the unallocated space, and select the “Extend partition” item.

Next, the Volume Expansion Wizard opens, in which you will be asked to select a disk through which you want to increase the space on the local partition. In our case, this is just one volume, which was previously a hard disk partition.

Method 2: merging disk partitions in Acronis Disk Director.
This method is more reliable, since it is not necessary to transfer data from one disk to another in Windows: the program will independently merge the partitions. Acronis Disk Director has an intuitive interface that makes it easy for any user to understand.Note: There are 2 versions of this program: for Windows OS and a boot version. It is recommended to use the second version to avoid errors that may occur during the procedure. If this is not possible, then first make sure that your operating system is running without errors or failures.
The main window of the program will display information about all partitions of the hard drive. To merge, select the section you want to merge and click “Merge Sections” in the side menu.

A wizard will open in which you need to select the disks to merge, and also indicate which of them will be the main one, that is, which disk will be connected to which.
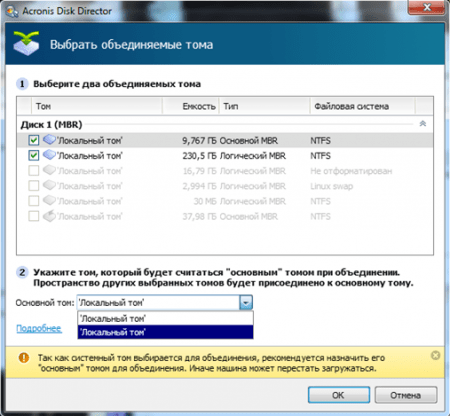
Having completed the necessary manipulations, you need to fix them by clicking the “OK” button. Now a new section will appear in the main window with the same volume as the previous 2. However, this does not mean that it has already been created. Acronis Disk Director uses transaction confirmation to avoid incorrect user actions. After completing the necessary manipulations, a checkbox will appear in the upper corner with the number of operations that need to be performed.

When you click on it, a window with a list of operations will appear. Here the user can once again check the correctness of his actions. If everything is correct, then clicking the “Continue” button will start step-by-step disk partitioning according to the instructions specified by the user.

This process is irreversible. If the program is running under Windows OS, the computer will be rebooted to complete the operation.
You can also use the Partition Magic and Paragon Partition Manager programs to combine hard disk partitions. They are similar in functionality to Acronis Disk Director, so you can use either of them. All of these disk merging programs work well for any version of Windows.


Popular
- Best Calendar Apps for Android Simple Calendar for Android 6
- All video reviews of Samsung Galaxy S4 Mini LTE GT-i9195 Bluetooth is a standard for secure wireless data transfer between various devices of different types over short distances
- The very first telephones in the world The principle of operation of a telephone “on the fingers”
- Samsung Omnia M - Specifications
- Download Instagram for Android 2
- Review of Samsung Galaxy A9 (2018) - a blatant deception of Korean marketers
- Samsung GSM(3G) GT-S5300 device drivers: main operating systems
- Flashing Sony Xperia using Flashtool
- How to fix problems with GPS on Xiaomi Where is the xiaomi gps
- Remote access via proxy